
SmartPour Operating Guide (1.75L)
Safety Guidelines
This appliance is only to be used for its intended purpose, and with all applicable laws, rules, and regulations.
This appliance can be used by persons if they have been given supervision or instruction concerning use of the appliance in a safe way and understand the hazards involved.
Persons under the legal age for alcohol consumption as per the local regulations shall not operate the appliance.
Cleaning and user maintenance shall not be made by children.
This appliance can only be connected to the correct voltage rating corresponding to the label on the appliance.
This appliance contains batteries that are only replaceable by skilled persons.
SmartPour Introduction
The SmartPour 1.75L Variant is designed to work only with the 1.75L ecoTOTE, available only in some markets.
Your SmartPour is a second-generation, intelligent spirits management system that pairs with the award-winning ecoTOTE™ and makes sustainable reuse of branded spirits bottles possible for the first time. Wi-Fi-enabled and powered by our cloud-based CircularONE™ technology, each SmartPour offers hygienic transfers of spirits to glass bottles, cocktail shakers and serving vessels.
The purpose of this Operating Guide is to provide you with the necessary steps and instructions to operate your SmartPour safely and sanitarily. This Operating Guide covers the key steps involved in registering, cleaning, and using of the SmartPour.
Component Name | |
|---|---|
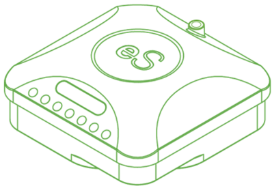
SmartPour 1.1S+ |
|
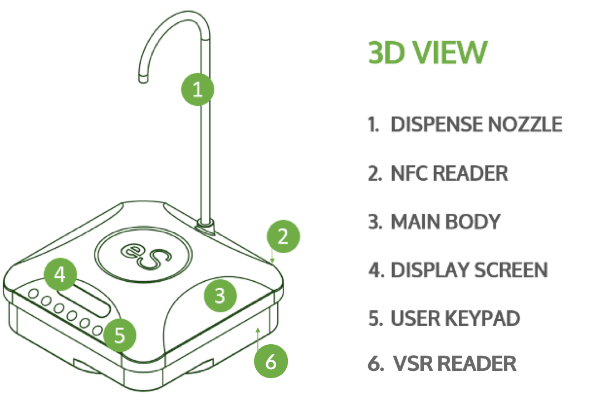
Component Name | |
|---|---|
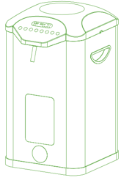
SmartPour 2.0S+ |
|
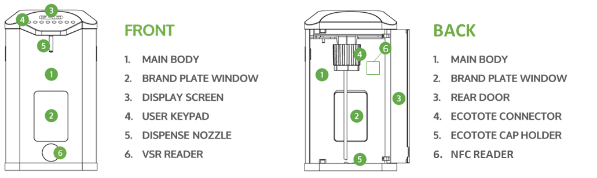
SmartPour Accessories
Please ensure that the following items are included in with your SmartPour. Please store your unit and its accessories in a clean, dry, and accessible location between use.
Only SmartPour 1.1S+ | Available in both models | Only SmartPour 2.0S+ |
|---|---|---|
| |
|
1 x SmartPour 1.1S+ | 2 x PE Inlet Tube with Anti-Vacuum Adapter 1 x Soft Outlet Hose | 1 x SmartPour 2.0S+ |
|
|
|
1 x O-Ring Set The O-Ring Set comprises of 2 x Red O-Ring | 1x Volume Label Sticker Sheet | 1 x Spare Gasket |
|
| |
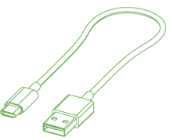
1 x Stainless Steel Dispense Nozzle | 1 x USB-C Charging Cable | |
| ||
2x Anti Drip Nozzle Adapter |






Anti Drip Nozzle Adaptor
To prevent drips from the dispense nozzle, follow these steps to apply the Anti Drip Nozzle Adaptor to the Stainless Steel Dispense Nozzle.
| Rinse the Adaptor Attach the Adaptor Secure the Fit Ready to Dispense |
SmartPour Display Screen & Keypad
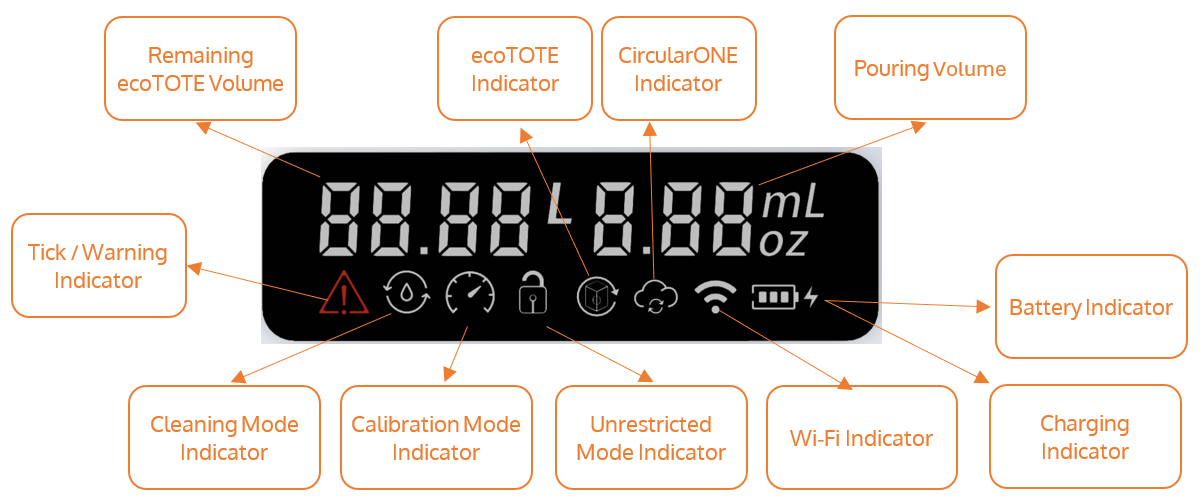
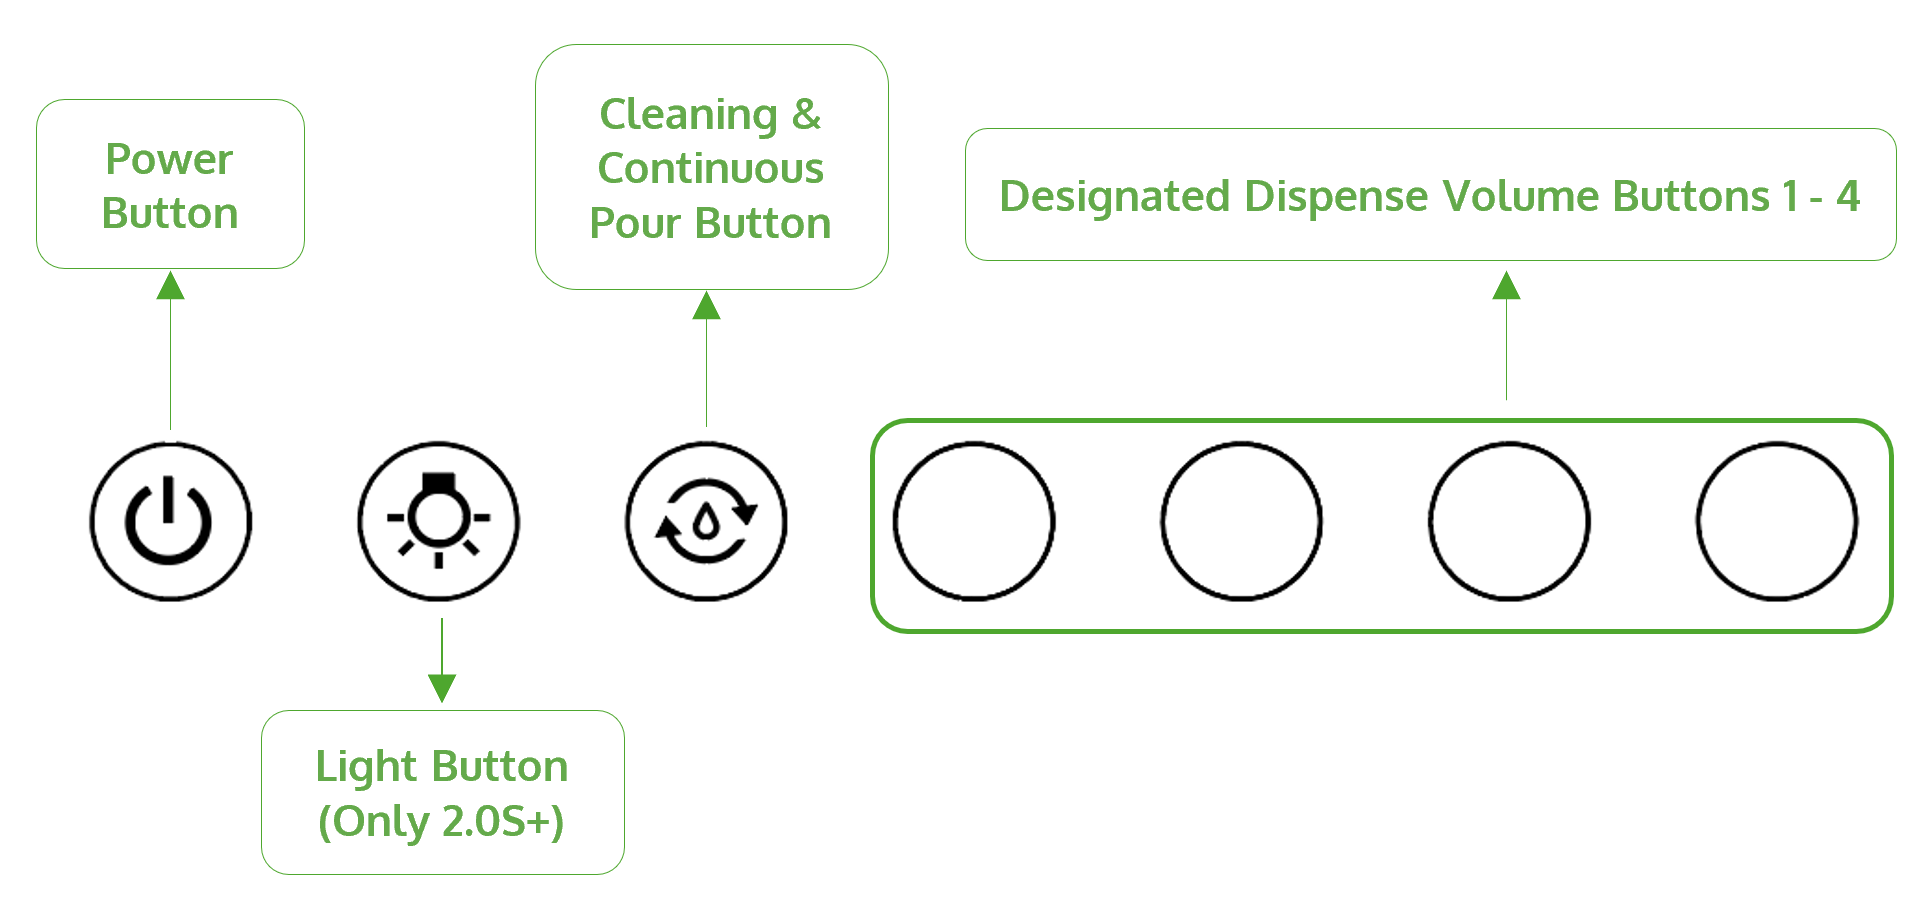
Your SmartPour features a back-lit LCD Display Screen and a touch-sensitive User Keypad to allow the user to conveniently operate all key functions.
SmartPour Display Screen |
|---|
|
SmartPour Keypad |
|---|
|
Important Note
The SmartPour is available across regions (AMER, EMEA and APAC) with user adjustable programmable dispense volumes. The ’Designated Dispense Volume Buttons’ may be set by the user to match common regional pouring volumes or for ease of use.
SmartPour Display Description
SmartPour Screen | Display | Description |
Cleaning Mode Indicator |
| Indicator will appear only when cleaning mode is activated |
Remaining ecoTOTE Volume |
| Displays the volume of liquid remaining in the ecoTOTE |
Pouring Volume |
| Indicator will display the selected dispense volume and measuring unit |
ecoTOTE Indicator |
| Indicator will appear only when NFC enable ecoTOTE is detected |
CircularONE Indicator |
| Indicator will appear only when the SmartPour is connected to CircularONE |
Tick/Warning Indicator |
| Tick and warning indicator refers to successful/unsuccessful action |
Battery Indicator |
| 3 bar - >= 66% 2 bar - 33% - 66% 1 bar - 5% - 33% 0 bar - 0% - 5% |
Charging Indicator |
| Indicator will appear only when the SmartPour is connected to a charger |
Wi-Fi Indicator |
| Static indicator - Wi-Fi is connected. Blinking indicator – Disconnected or pairing mode |
Unrestricted Mode Indicator |
| Indicator will appear only when the SmartPour is set to unrestricted mode |
Calibration Mode Indicator |
| Indicator will appear only when the SmartPour is set to calibration mode |









SmartPour Specifications & Features
SmartPour 1.1S+ | SmartPour 2.0S+ |
|---|---|
General Specifications | |
Dimensions: 6.3” x 6.3” x 3.1” | Dimensions: 8.4” x 9.8” x 13.6” Weight: 4.63 lbs |
Charging | |
Your SmartPour can be charged using the provided USB-C Charging Cable and one of the following types of USB-A chargers:
| |
Features | |
Your SmartPour has the following intelligent technology features:
| |
Setting Your SmartPour to Restricted Mode
Instructions |
|---|
Note: 1) Ensure SmartPour is NOT mated to the ecoTOTE during this step 2) Ensure that the Unrestricted Mode Indicator - |
Step 1: Turn on the SmartPour by tapping and holding the ‘Power’ Button. The screen will illuminate and an audible beep will be heard. |
Step 2: Once the SmartPour is turned on, repeatedly tap the Power button. The screen will first display the version number (e.g., 1.2 1.2). Continue tapping the Power button until the screen changes again and shows the main display. This may take around 30 taps in total. |
Step 3: The Unrestricted Mode Indicator should not be showing on screen to indicate that the SmartPour is in Restricted Mode. |
Pairing Your SmartPour – CircularONE
Instructions | |
|---|---|
Note: Ensure SmartPour is NOT mated to the ecoTOTE during this step | |
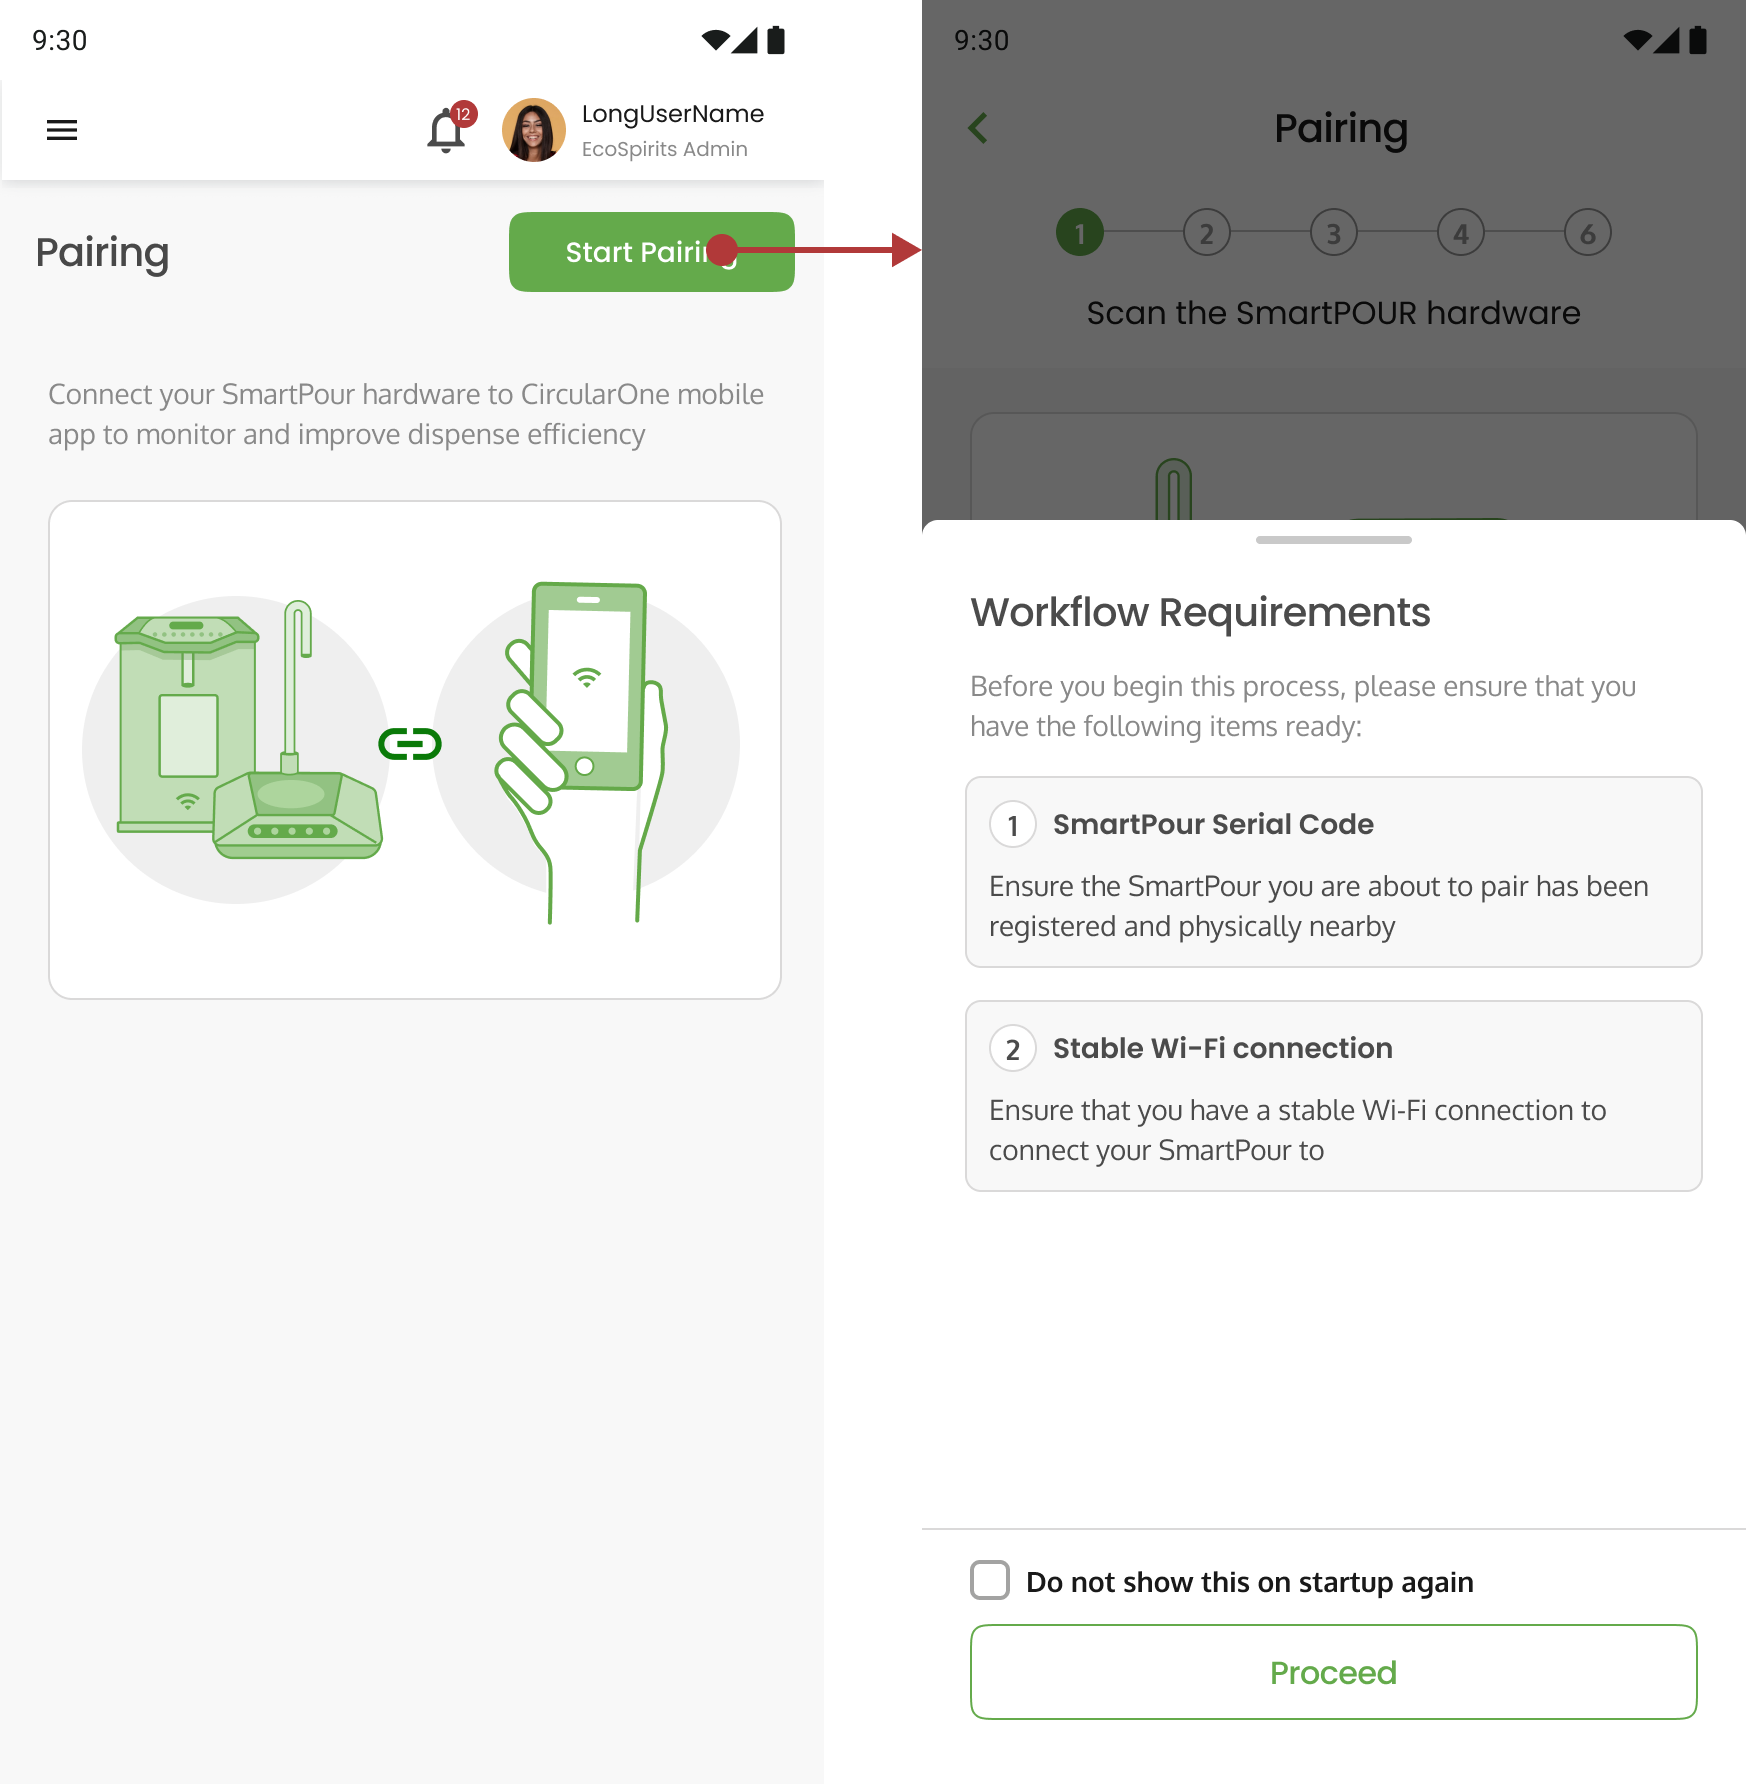
Step 1 : Head to ‘Pairing’ under Hardware Management | |
Step 2 : View the summary synopsis for SmartPour Pairing and select ‘Start Pairing’ to begin | |
| |
Step 3 : View the workflow requirements | |
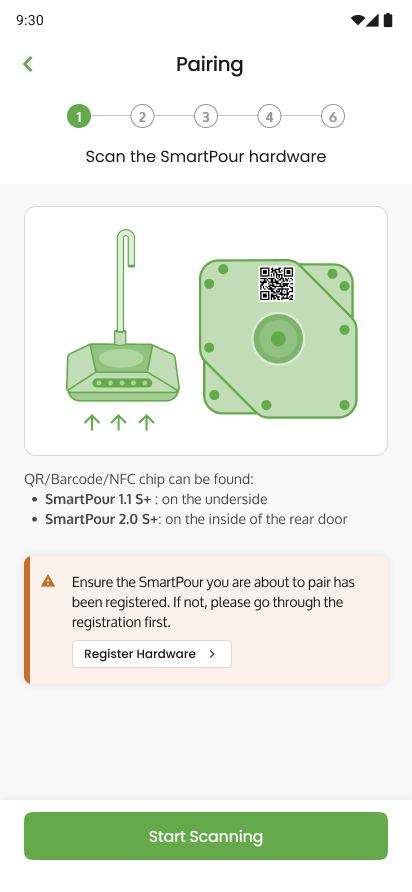
Step 4: View the instructions to scan the SmartPour and select ‘Start Scanning’ to proceed | |
| |
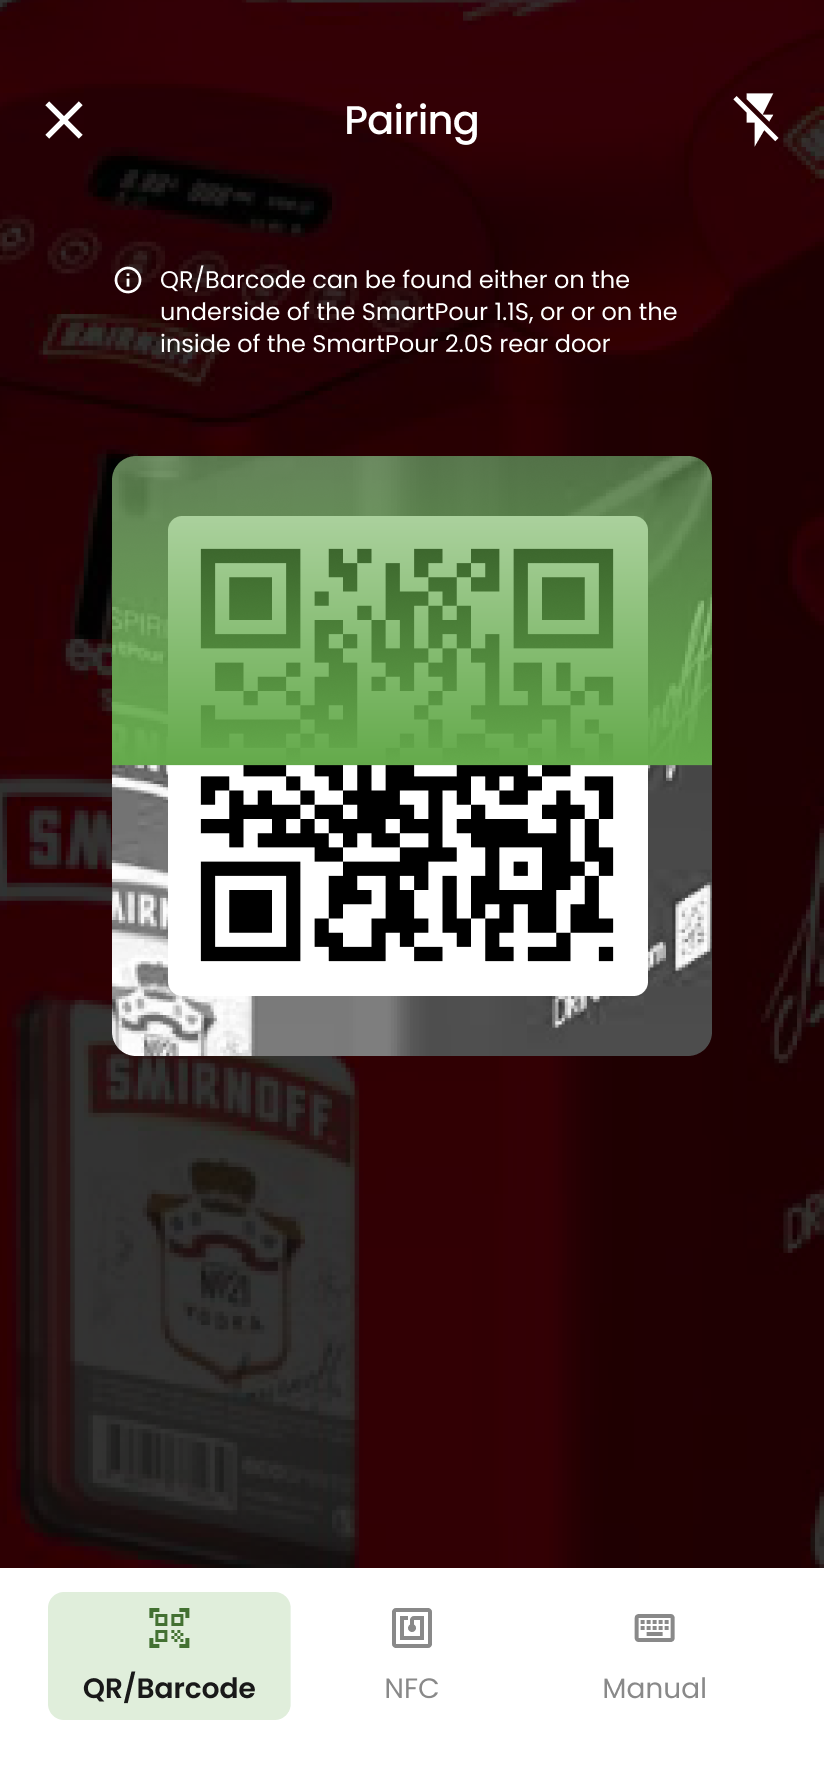
Step 5 : Scan the ScanPour hardware code either by QR Code, NFC or Manual Input | |
| |
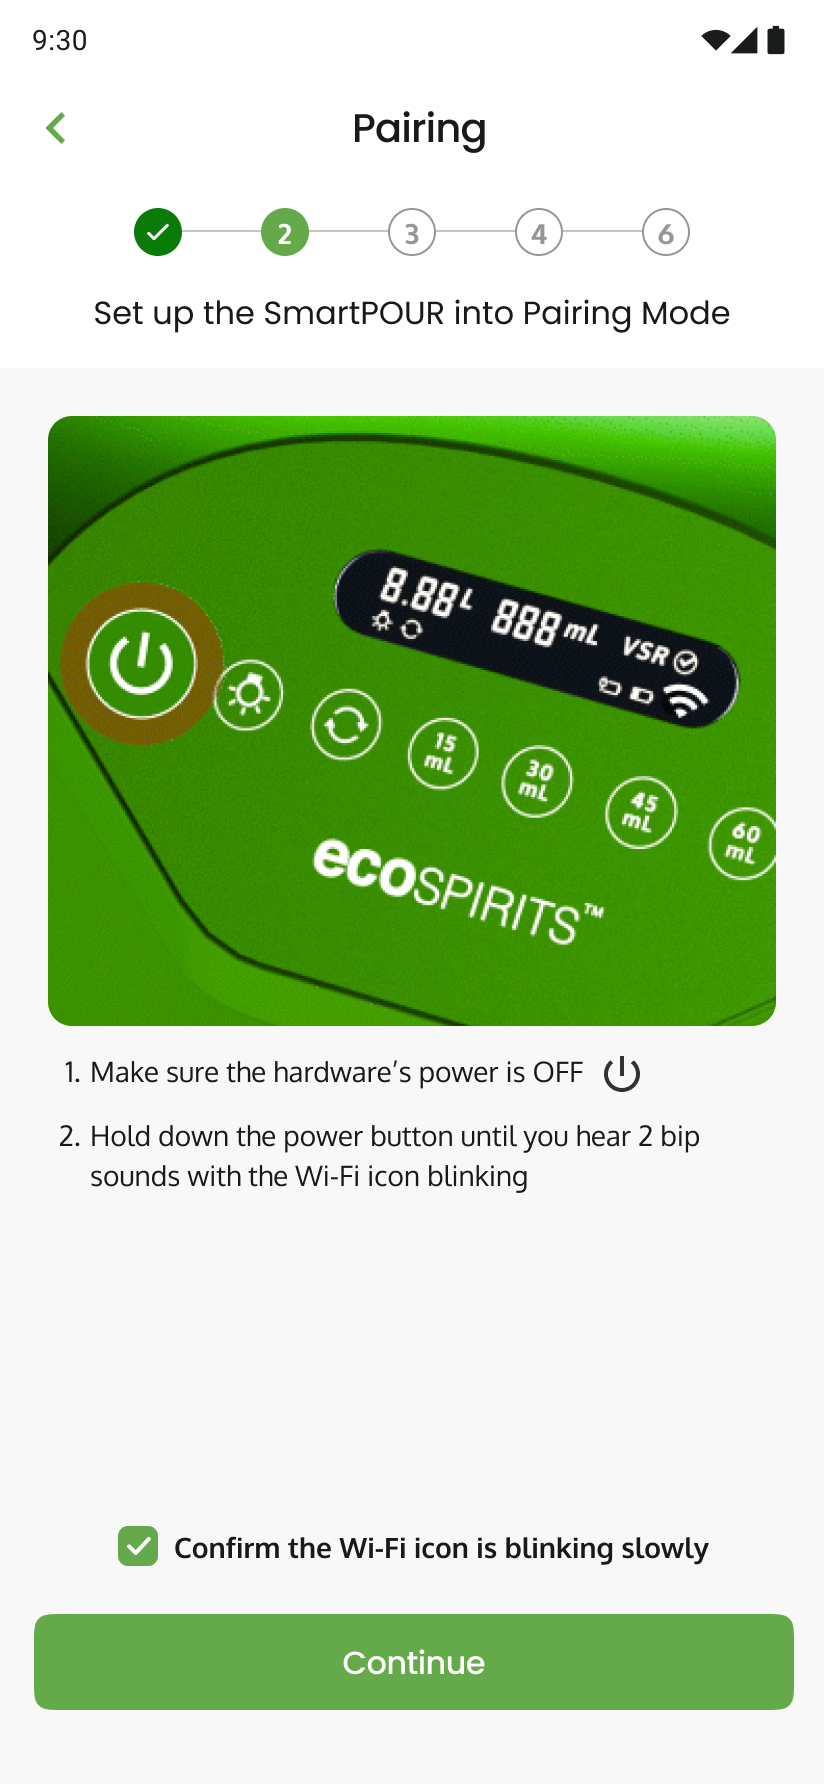
Step 6 : If successful, you will be directed to the next step to set up the SmartPour in Pairing Mode | |
Step 7 : Check the checkbox to confirm that the Wi-Fi icon is blinking on the SmartPour and select ‘Continue’ to proceed | |
| |
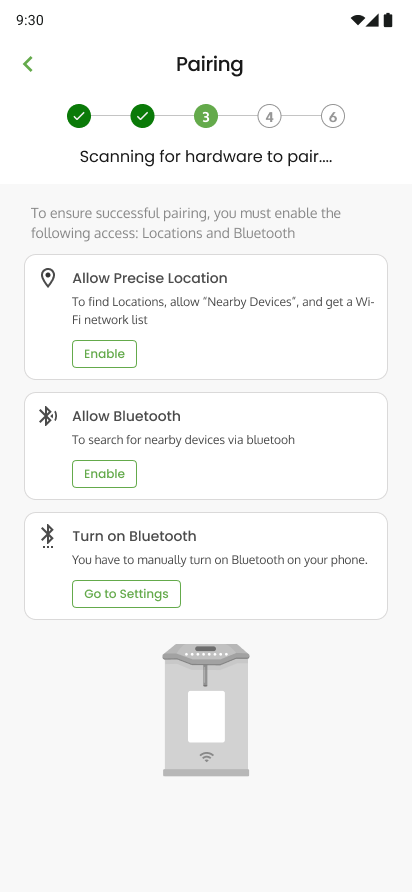
Step 8 : If you’re performing SmartPour pairing for the first time, you will need to turn on your bluetooth and make sure both location and settings are enabled on your mobile device | |
| |
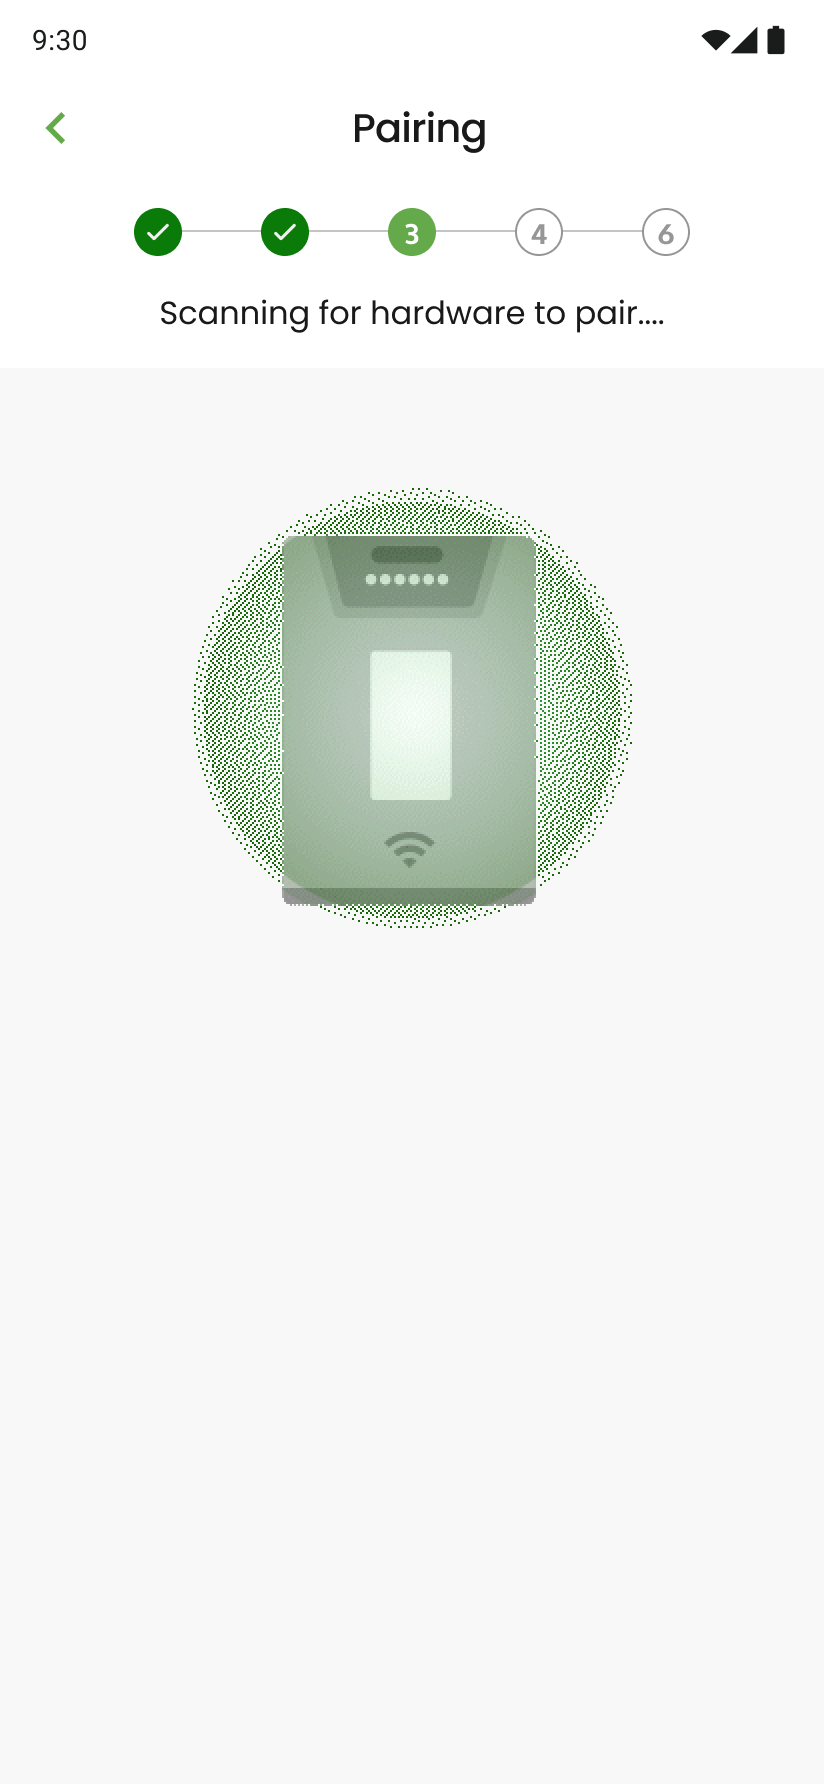
Step 9 : Once enabled, the mobile device will scan for a SmartPour to pair | |
| |
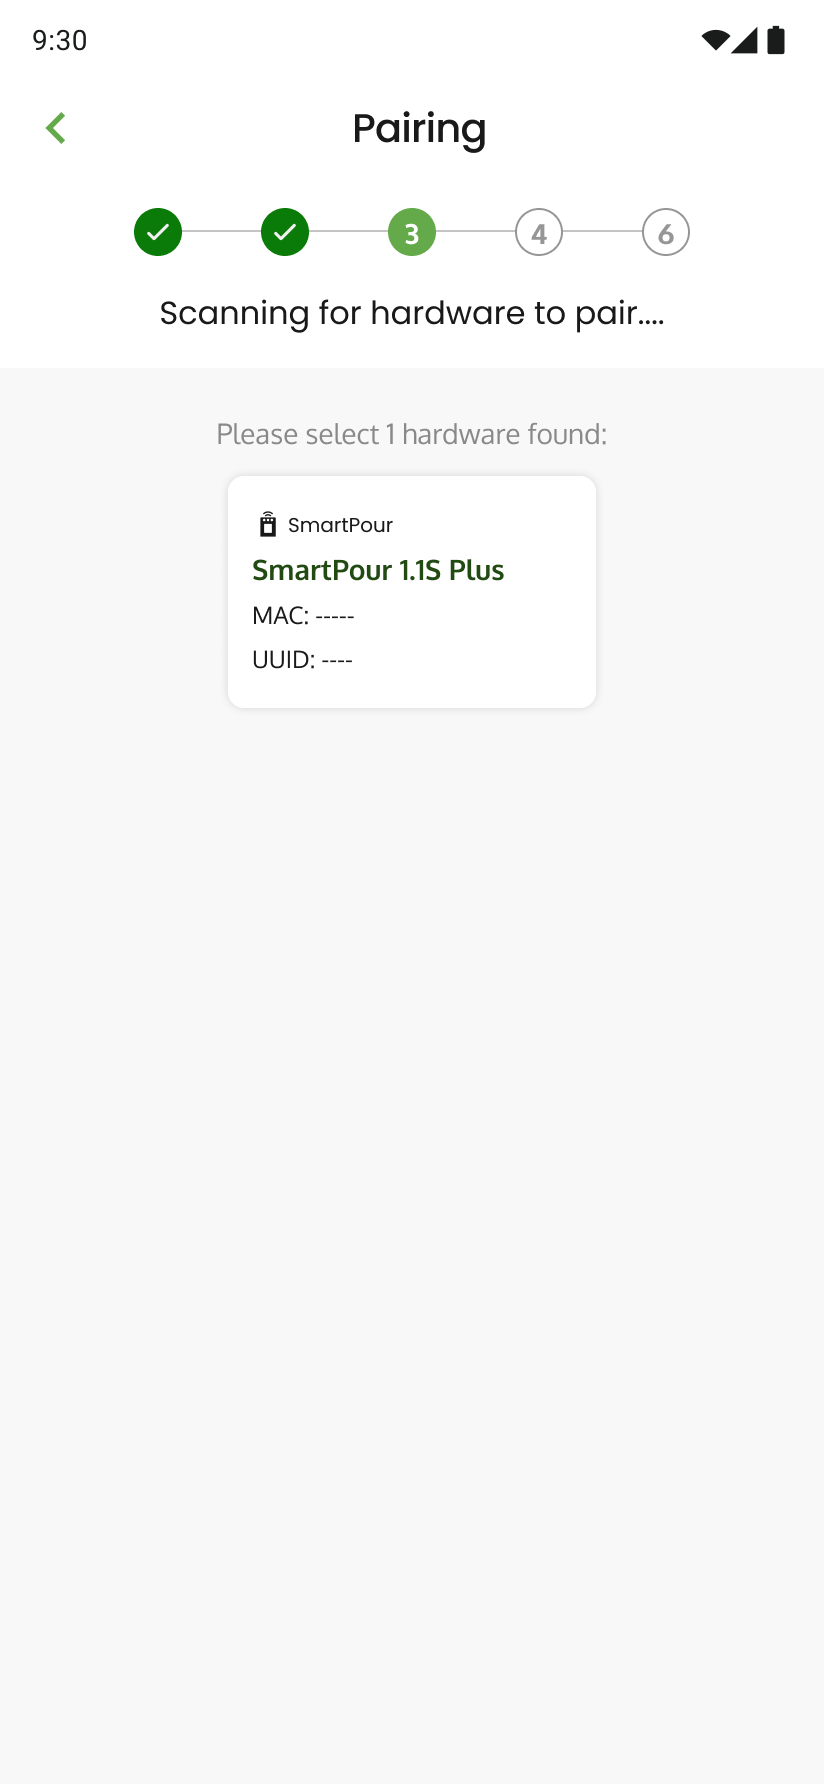
Step 10 : Once a SmartPour has been detected, you will see the corresponding SmartPour reflected. Select the SmartPour that you would like to pair. | |
| |
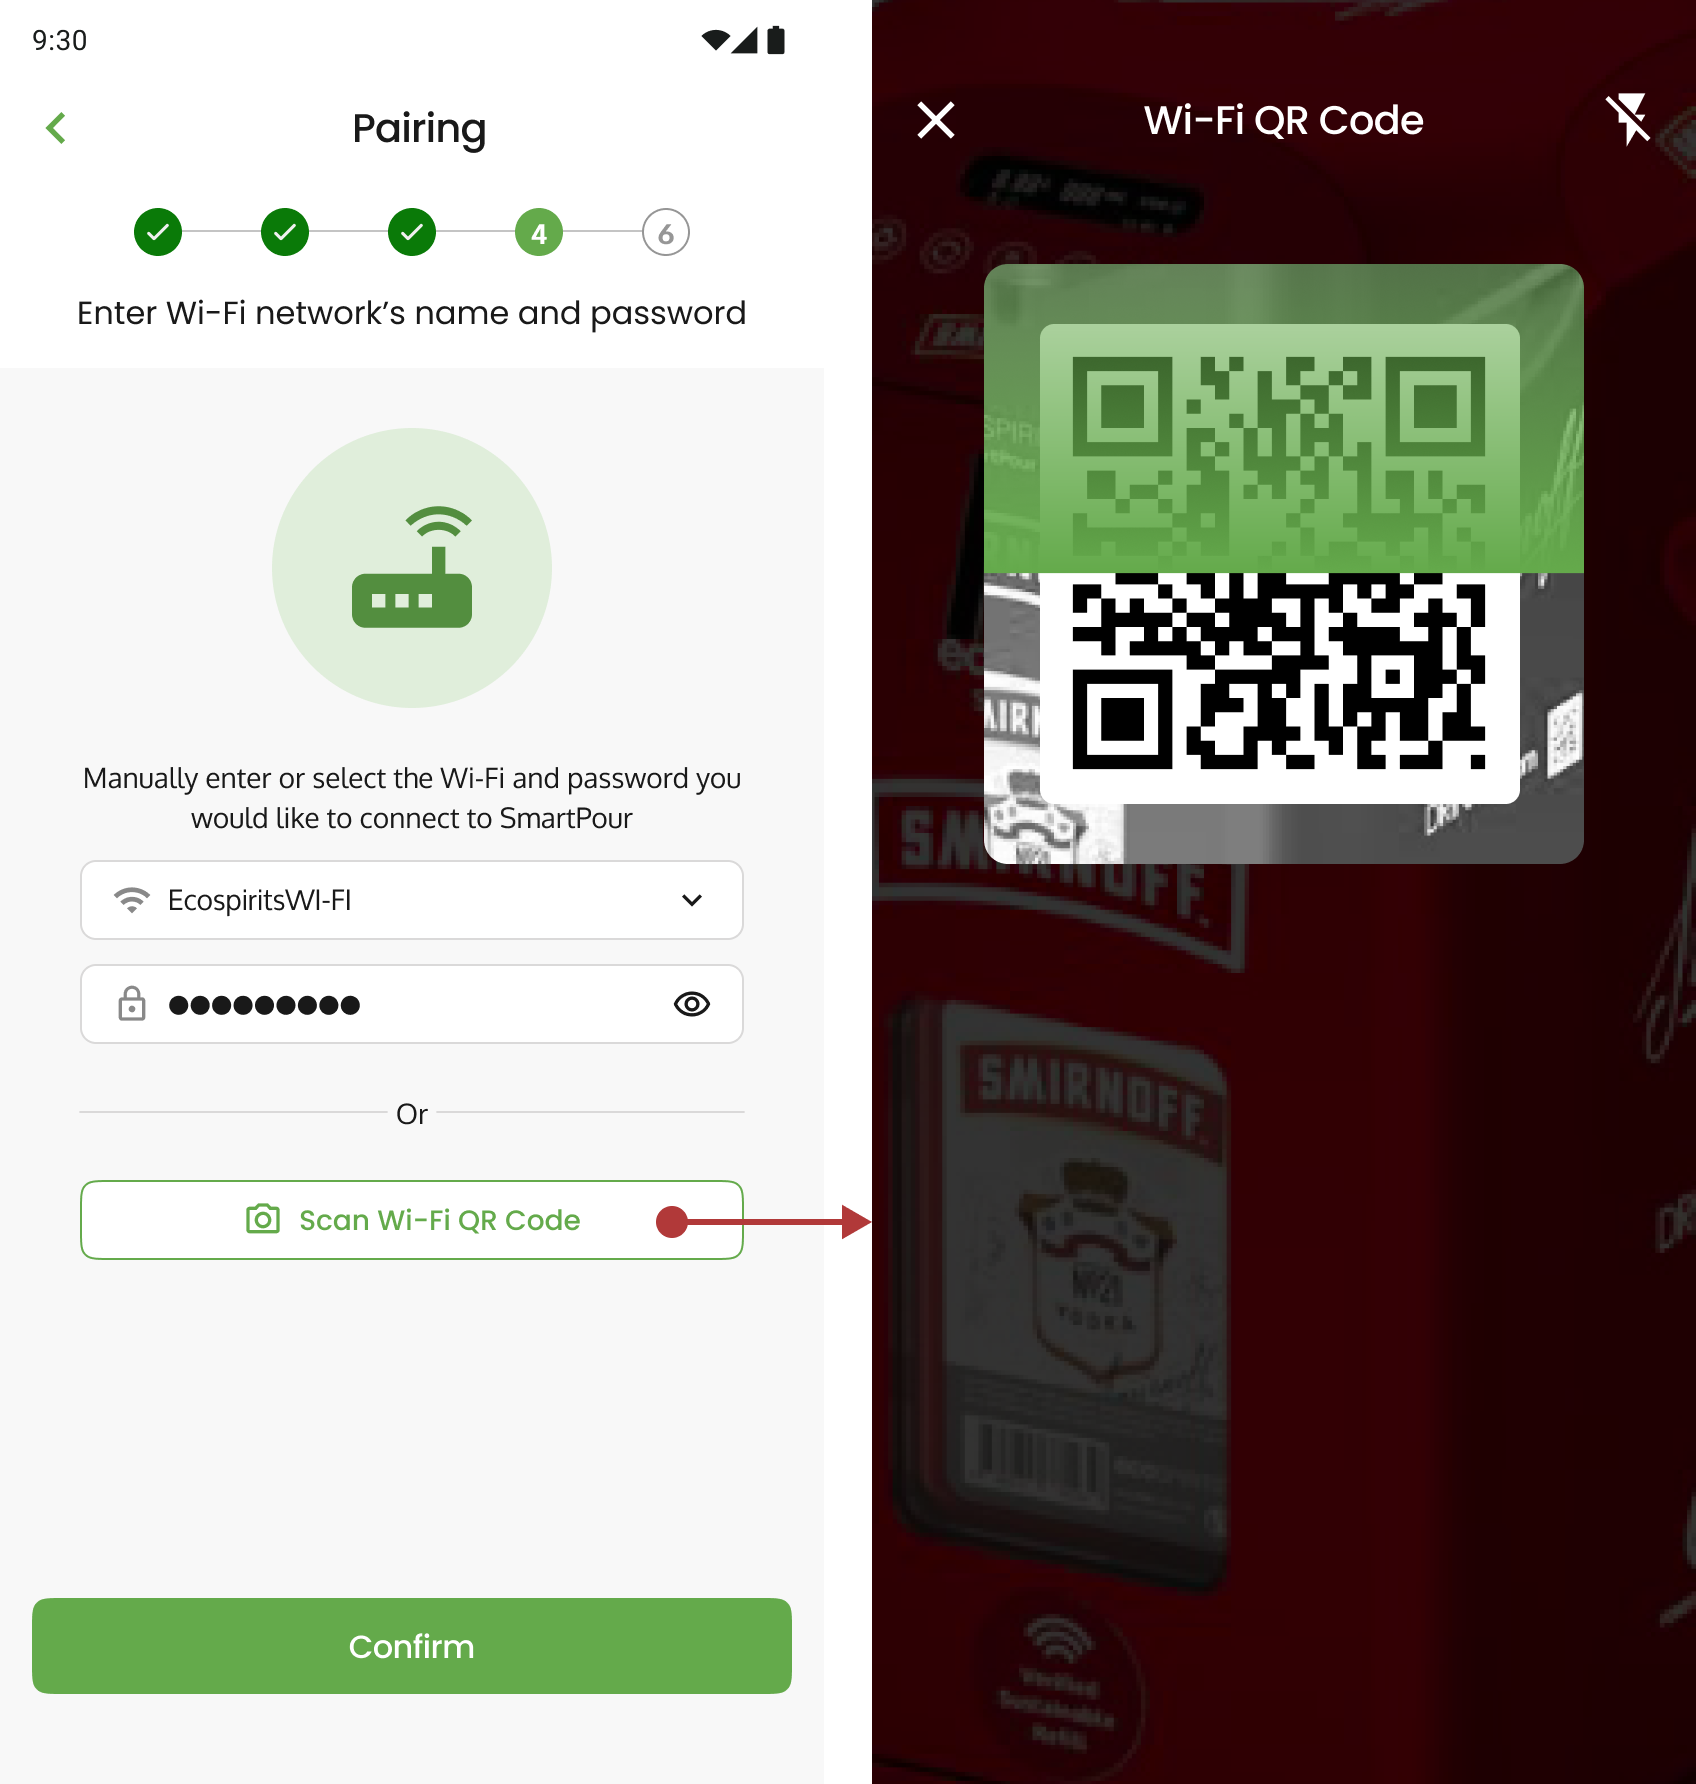
Step 11 : You will be directed to key in your Wi-Fi credentials. You can either scan your Wi-Fi Code or key in the credentials manually. Select ‘Confirm’ once you have completed. | |
| |
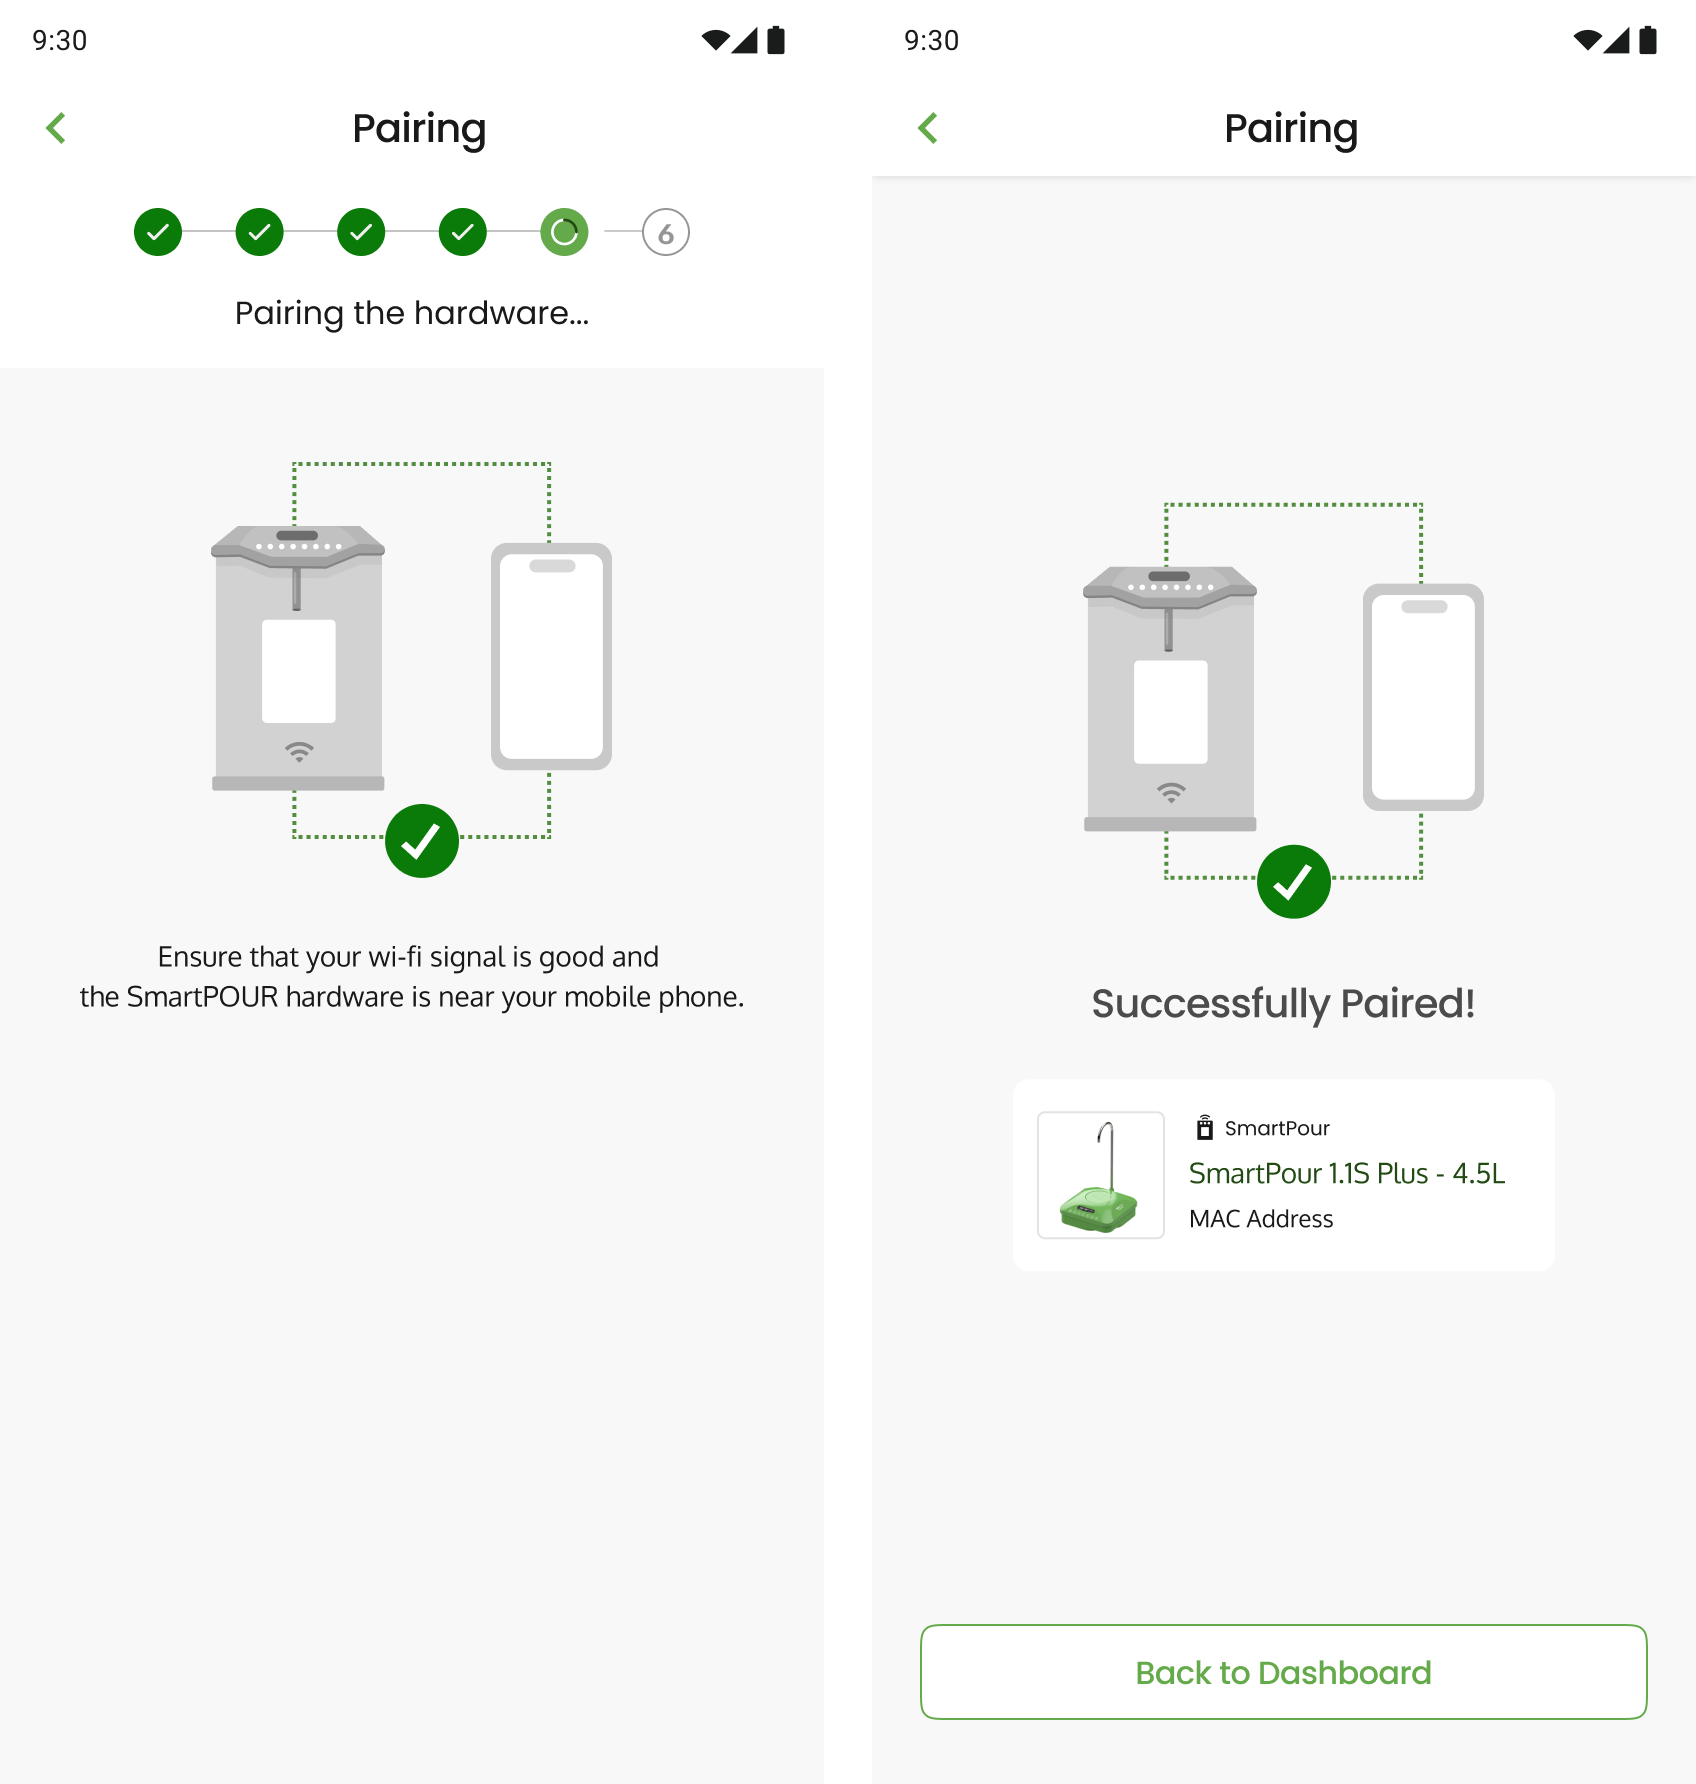
Step 12 : If successful, the pairing process will begin (You will be redirected to re-pair your SmartPour once the process has timed out after 3 minutes.) | |
| |
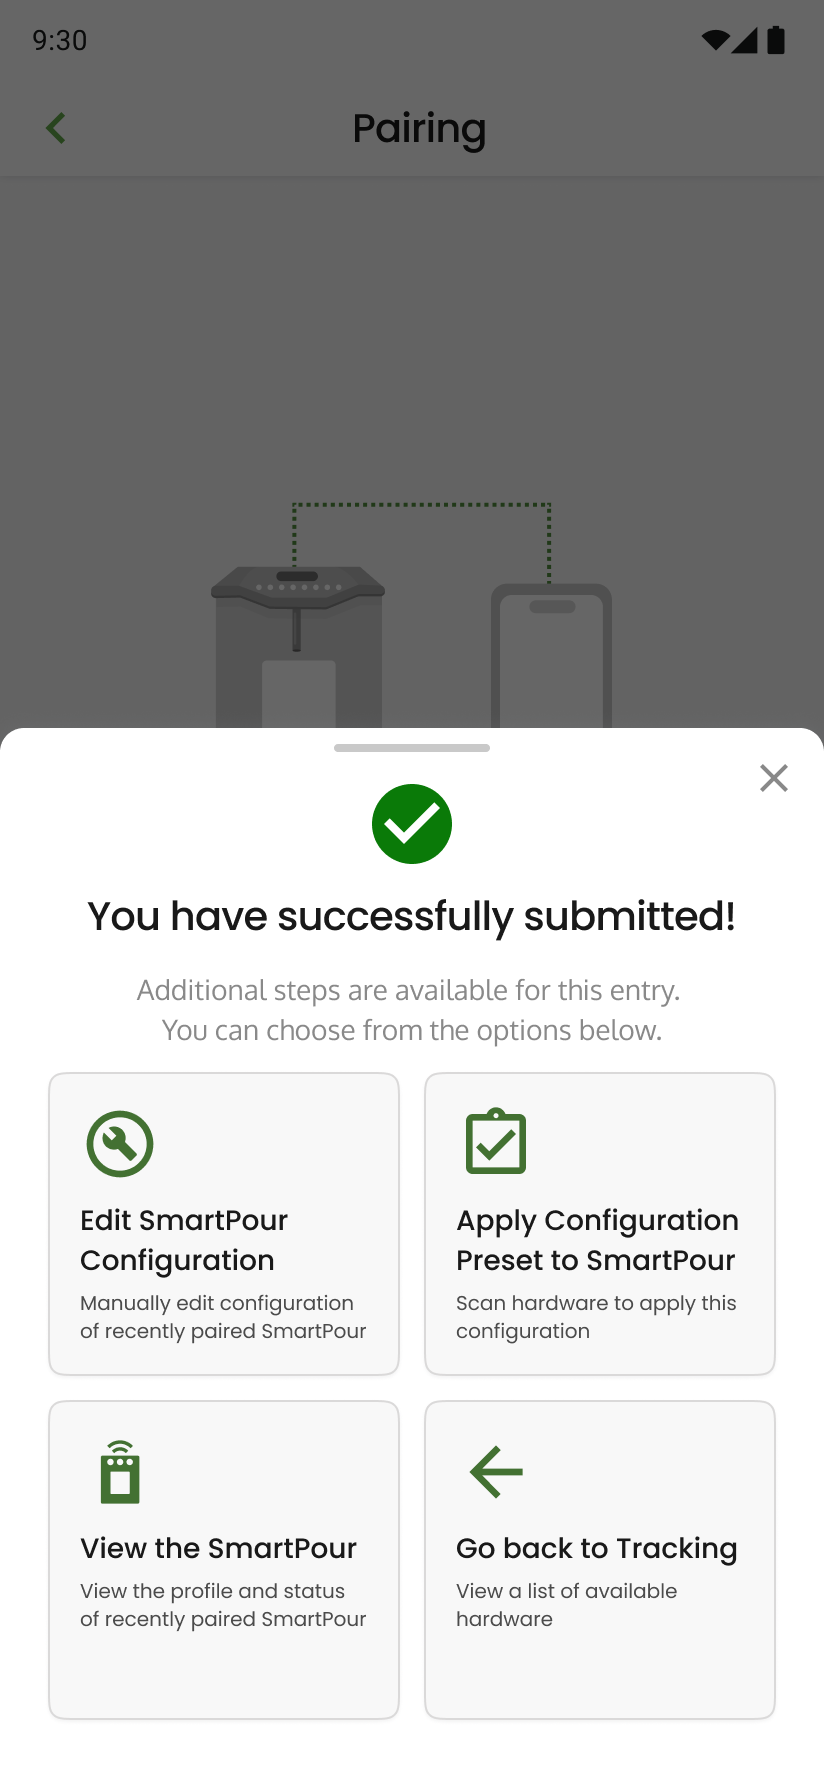
Step 13 : Once the SmartPour has been successfully paired, you will be able to select one of the 4 available options to continue
| |
|
Configuring Your SmartPour
CircularONE App Method (Dispense Unit & Volume)
Instructions | |
|---|---|
Note: Ensure SmartPour is NOT mated to the ecoTOTE during this step | |
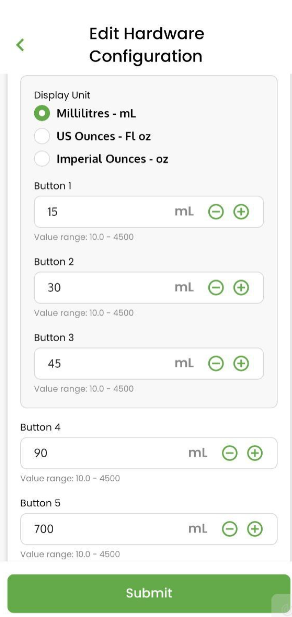
Step 1 : After successful pairing, tap on “Edit SmartPour Configuration” | |
| |
Step 2 : Input your desired “Display Unit” and Dispense Volume into the table. Once completed, click on “Submit”. | |
| |
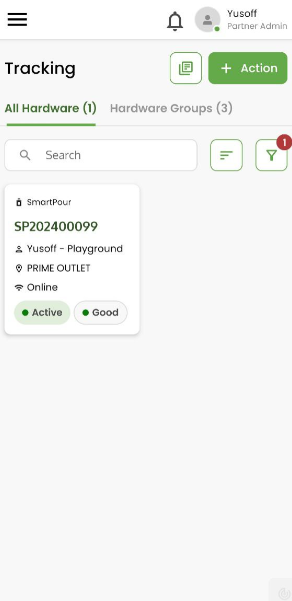
Step 3 : Alternatively, you can head to "Tracking” on the navigation menu and search for the SmartPour ID. | |
| |
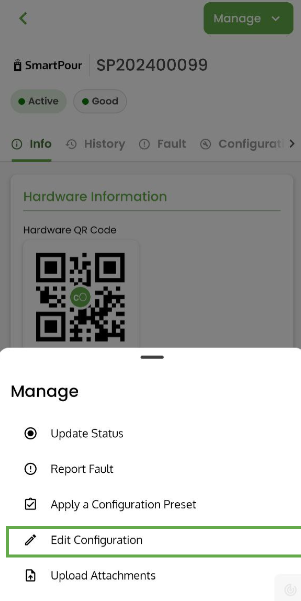
Step 4 : Tap on “Manage” and select “Edit Configuration”. Refer to Step 2 on setting up the SmartPour. | |
|
Manual Adjustment Method (Dispense Unit)
|
Instructions |
|---|
Note: Ensure SmartPour is powered on and NOT mated to the ecoTOTE during this step |
Step 1 : To change your dispense unit (ml, oz) press the ‘Cleaning Button’ 8 x times, then press ‘V4’ for 5 x times to enter the dispense unit selection page. |
Step 2: Tap on ‘Cleaning Button’ to select the desired dispense unit (mL/ US – oz/UK – oz). |
Step 3: Press the power button to exit. |
Manual Adjustment Method (Volume)
Instructions |
|---|
Note: Ensure SmartPour is powered on and NOT mated to the ecoTOTE during this step |
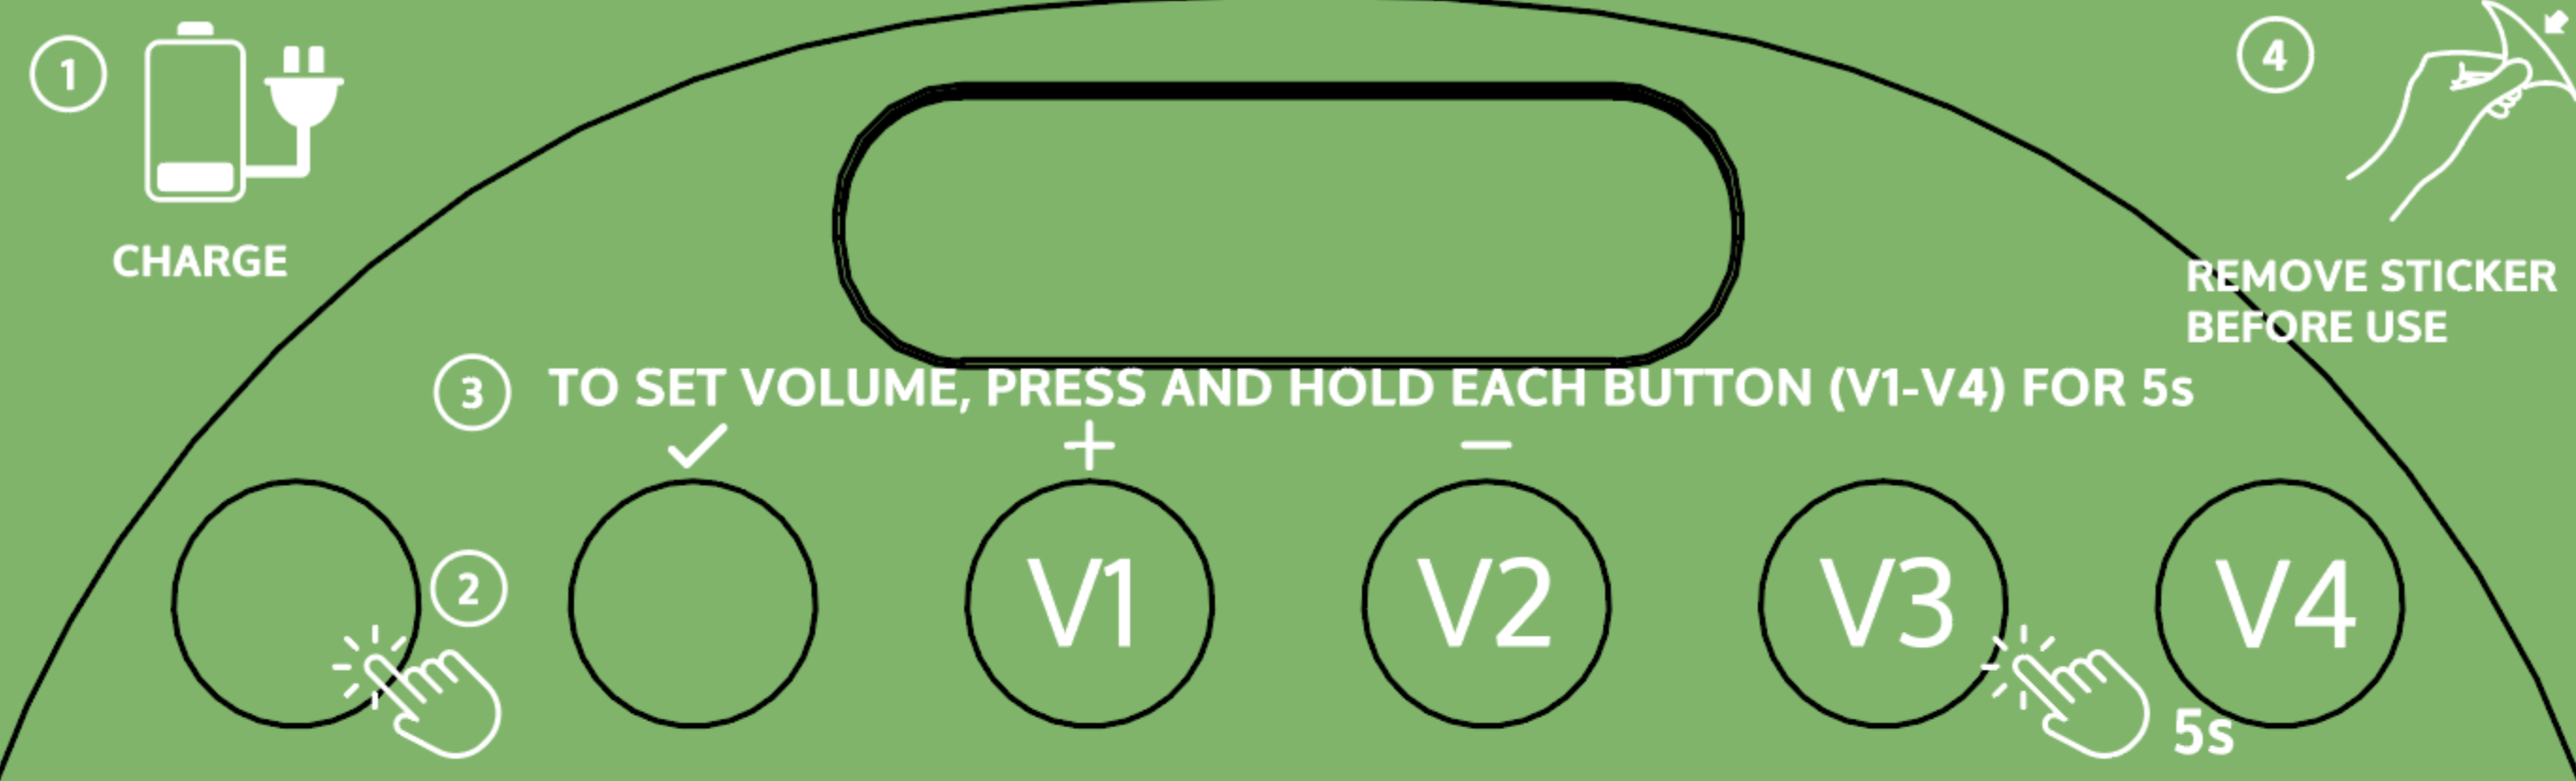
Step 1 : Press and hold the volume button you wish to adjust. The screen will start to blink. |
Step 2 : Tap/hold either the ‘V1’ button to increase or the ‘V2’ button to decrease the volume value. |
Step 3 : When desired volume is reached press the ‘Cleaning button’ once to confirm the new value. |
Step 4 : Paste the corresponding volume sticker in the sticker deck provided on the volume dispense button. |
Step 5 : Repeat Step 1-4 for the remaining Button Volume. |
Cleaning Your SmartPour
Your SmartPour should be cleaned before using it for the first time and for each time you switch between spirits or after any extended period of non-use. To clean your SmartPour, follow these steps.
Instructions | SmartPour 1.1S+ | SmartPour 2.0S+ |
|---|---|---|
Step 1 : Dispense Nozzle and Inlet Tube Cleaning | Wash both the Stainless Steel Dispense Nozzle and Inlet Tube (inside and out) with clean running water. Shake off excess water. | Wash only the Inlet Tube (inside and out) with clean running water. Shake off excess water. |
Step 2 : Assembly of Dispense Nozzle | Dampen the O-ring with water. Align and gently push the nozzle into the dispensing aperture without twisting to avoid breaking the O-Ring. | Not Required |
Step 3 : Assembly of Inlet Tube | Push-fit the plain end of the Inlet Tube into the bottom of the SmartPour. | Push-fit the plain end of the Inlet Tube into the bottom of the SmartPour. |
Step 4 : Set Up Cleaning Container | Fill a clean container with at least 2L of hot water (40-60°C). Submerge the Inlet Tube under the water. | Fill a clean container with at least 2L of hot water (40-60°C). Submerge the Inlet Tube under the water, you may use the Brand Plate Window to check submersion. Open/close the back door as needed to adjust container position. |
Step 5 :Run Cleaning Cycle | Place an empty container under the nozzle. Power on. Press and hold the “Cleaning Button” for 5 seconds. Wait for the cleaning water to fully dispense. To restart a stopped cycle, press and hold the button again. Press the "Cleaning button" to stop the dispense. | Place an empty container under the nozzle. Power on. Press and hold the “Cleaning Button” for 5 seconds. Wait for the cleaning water to fully dispense. To restart a stopped cycle, press and hold the button again. Press the "Cleaning button" to stop the dispense. |
Using Your SmartPour
To use your SmartPour, follow these steps.
Instructions | SmartPour 1.1S+ | SmartPour 2.0S+ |
|---|---|---|
Step 1 : Power On & Pre-Check |
|
|
Step 2 : ecoTOTE Loading |
|
|
Step 3 : Priming & Automatic Adjustment |
|
|
Step 4 : Dispensing |
|
|
SmartPour Calibration
Each SmartPour unit has been pre-calibrated at the factory as part of the quality control process. However, if you notice that your SmartPour unit is starting to show significant deviation from selected dispense volume, a recalibration might be required.
The spirit intended for use is recommended for the calibration process. In the absence of the spirit, water can be used as a substitute noting that the volume of dispensed product may not correspond exactly to the pre-set dispense volume due to the difference in viscosity and surface tension of both liquids.
Item | Details |
|---|---|
Empty Container | Any clean container to collect dispensed liquid |
Calibration Liquid | Minimum 1L of spirit intended for use or the substitute at room temperature |
Measurement Tool | Use either: - Measuring Cylinder OR -Weighing Scale + Known Liquid Density |
Instructions | Details |
|---|---|
Step 1 : Power On | Touch the Power button to turn on SmartPour. |
Step 2 : Prep for Calibration | Connect the SmartPour to the spirits and place the empty container under the dispense nozzle. Prime the SmartPour. |
Step 3 : Enter Calibration Mode | Press the Cleaning Button 8 times. Screen should show: |
Step 4 : Dispense for CL1 | Press V3 twice to dispense ~45–50mL. |
Step 5 : Measure Output | Use measuring cylinder or scale to measure actual volume dispensed. |
Step 6 : Input Actual Volume | Use V1 (+) or V2 (–) to adjust the displayed value. Example: |
Step 7 : Move to CL2 | Press Cleaning Button to proceed. Screen shows: |
Step 8 : Dispense for CL2 | Press V3 twice to dispense ~450–500mL. |
Step 9 : Measure Output | Again, measure the actual volume dispensed. |
Step 10 : Input Actual Volume | Adjust using V1 (+) or V2 (–).Example: |
Step 11 : Confirm Calibration | Press the Power Button to confirm and save calibration settings. |
Completed! | Your SmartPour is now calibrated and ready for use. |
Troubleshooting Guide
To identify a problem with a SmartPour, follow the troubleshooting measures below:
Malfunction Symptom: | The SmartPour does not turn on |
|---|---|
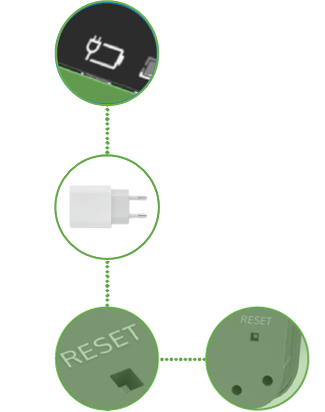
| Using ONLY the provided charging cable, make sure the unit is being charged by confirming the charging indicator is lit up on its display screen. If the charging indicator doesn’t appear, leave the SmartPour plugged in. It may take up to 15 minutes for the SmartPour to charge and for the screen to light up. Alternatively, try using another charging power adapter. Recommended chargers’ adapters: USB-A chargers with either 5V/1A (5w chargers) or 5V/2A (10w chargers). Make sure the SmartPour is NOT connected to power. Press the RESET button located at the bottom side of the unit. Note: Reset Button is NOT available in all the units |
Malfunction Symptom: | The SmartPour does not dispense liquid |
| Double tap one of the variable volume buttons in rapid succession. If the device emits sounds but no liquid is dispensed, ensure the inlet tube is properly fitted to the device. |
Malfunction Symptom: | SmartPour is leaking on the nozzle connection area to the unit |
| Check that the nozzle has 2 O-rings attached and seated in their proper place. A Spare O-rings Set is provided for each unit. NOTE: Gently insert the nozzle by following a screw/unscrew motion. |
Malfunction Symptom: | SmartPour is pouring inaccurate dispenses. |
| The unit needs to be calibrated. Refer to the calibration section. |



Repair and Replacement
If any of the troubleshooting measures do not fully correct the issue, please follow the Repair and Replacement process described below.
| Remove unit from service and utilize another unit if available until SmartPour can be repaired or replaced. |
Please contact us at techsupport@ecospirits.global for remote support. | |
Place order for FOC replacement SmartPour with your ecoSPIRITS supplier if under warranty. Malfunctioning unit to be sent back for ecoSPIRITS diagnostics and repair. |
For more information, please contact techsupport@ecospirits.global
No comments to display
No comments to display